Specifications
Video Camera (color)
| Resolution | 1280 x 960 pixels |
| Frame Rate |
30 fps |
| Interface | USB 3.0 Vision |
Camera Cable
| Connector | USB 3.0 |
| Connection | Micro B screw lock/A |
| Length | 3m or 5m |
Setup
USB Cable Connection
-
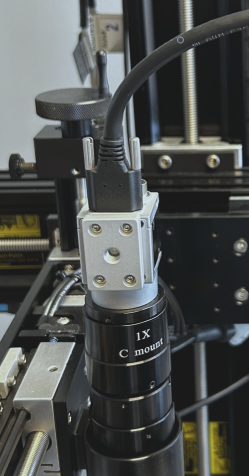
Connect the USB3 cable to the back of the camera and tighten the thumbscrews.
-
Insert the opposite end of the USB3 cable in an available USB3 port in the back of the computer to prevent intermittent camera connection problems.
-
Connect the USB3 cable to the back of the camera and tighten the thumbscrews.
-
Insert the opposite end of the USB3 cable in an available USB3 port in the back of the computer to prevent intermittent camera connection problems.
Figure 1: Connecting the Probing Camera USB3 cable
Figure 1: Connecting the Probing Camera USB3 cable
Operation
Troubleshooting
Intermittent Camera Connection
Symptoms
-
Camera connection is lost while capturing image
-
when the List Connected Cameras button list is clicked, the following message is displayed: "An error occurred while listing the video cameras connected to the computer"
Details
USB ports on the back of a computer are directly connected to the motherboard in most cases and this on-board connection to the USB controller is designed to resist (EM) interference.
On the other hand, USB ports on the front of the computer are connected to a pin header on the motherboard via a cable inside the computer case. The cable adds resistance, reducing maximum voltage and power and in some cases, the may even be unshielded. The cable and pin header connection increases susceptibility to electromagnetic interference (EMI) and power and signal quality issues.
Solution 1
Connect the camera USB3 cable to a USB3 port on the back of the computer
Video Camera Communication Error
Symptoms
USB3 Vision camera is not recognized.
Solution 1
Disable and then re-enable Matrox USB3 Vision drivers:
-
Open Device Manager (type “Device Manager” in the Windows search field).
-
Disable Matrox driver for USB3 Vision.
-
Disable Matrox managed USB3 Vision camera.
-
Enable Matrox managed USB3 Vision camera.
-
Enable Matrox driver for USB3 Vision.
If the problem continues, proceed to the next solution.
Solution 2
Turn off power management for USB3 Vision devices. To save power, Windows switches USB controllers off when not in use, and switches them back on again when they are needed. At times, Windows may fail to switch USB controllers on again.
-
Open Device Manager (type “Device Manager” in the Windows search field).
-
Expand the Universal Serial Bus controllers branch.
-
Double-click the first USB Root Hub device in the list (if you see only one USB Root Hub device, that is fine).
-
Click the Power Management tab.
-
Uncheck the Allow the computer to turn off this device to save power checkbox and click OK.
-
Repeat steps 3-5 for each USB Root Hub device in your list of Universal Serial Bus controllers.
