Emissivity Coating Equipment
PN0307
Electronic devices are often comprised of a variety of materials such as semiconductors, metal traces, ceramic substrates, heat sinks, and plastic packaging. The emissivity of these materials can vary significantly.
To accurately measure the temperature of these surfaces, it is necessary to compensate for each material’s emissivity. This can often be performed accurately on non-metal surfaces using Emissivity Tables or Region Emissivity in the Thermalyze software. This process involves heating electronic devices to a known control temperature and then performing an emissivity measurement in software.
The emissivity of non-coated metallic surfaces is often very low (below 0.20). The emissivity of polished gold, for example, can be below 0.02. For low-emissivity materials, software emissivity compensation alone is susceptible to significant errors due to variations in surface emissivity and errors in the control temperature measurement process.
A more reliable method of compensating for metal surface emissivity is to first increase the surface emissivity by applying a thin polymer coating using an airbrush. The coating increases the surface emissivity to approximately 0.50, depending on coating thickness and uniformity. After the coating is applied, Emissivity Tables or Region Emissivity software compensation can then be performed to obtain accurate temperature measurements.
Because the coating thickness is only 1-2 microns, its insulating layer affects are negligible. The coating is optically transparent but diffuses light. It is also nonflammable, low-toxicity, and can withstand continuous temperatures of up to 200°C (392°F). The coating can easily be removed with a nonflammable and low-toxicity solvent.
Applications
-
Increase emissivity of bare semiconductor die for junction temperature estimation
-
Increase emissivity of metal surfaces for lock-in thermography testing
-
Create uniform surface emissivity
Overview
Included Components
-
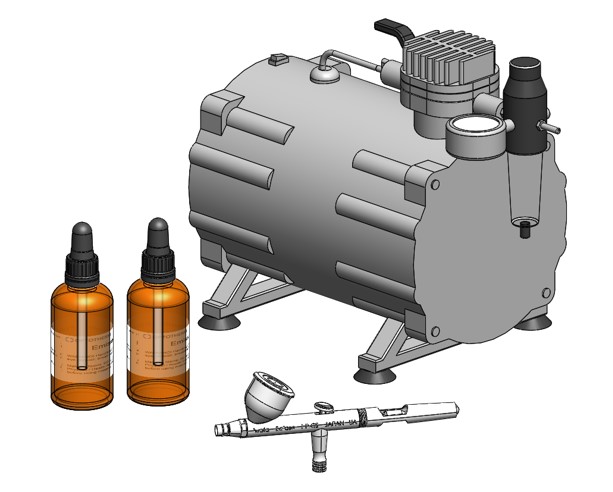
[PN0337] Emissivity Coating (4 oz. in eyedropper bottle)
-
[PN0338] Emissivity Coating Solvent (4 oz. in eyedropper bottle)
-
Precision detail atomizing airbrush
-
Tankless air compressor (1/5 HP, 0.7 CFM at 60 psi, 110-120VAC 60 Hz 3 pin American plug or 220-240VAC 50Hz 2 pin European plug, 8lbs)
-
Pneumatic hose (6 ft.)
-
Airbrush holder (bench edge mount)
Required Products
Related Products
Manufacturer Information
Specifications
Setup
Installation
-
Connect the air hose between the air brush and air compressor.
-
Mount the airbrush holder on the edge of the work bench.
-
Plug in the air compressor to a grounded power outlet.
Adjustments
Compressor Pressure Adjustment
-
Turn on the air compressor. Note: If your air compressor has a switch with two levels, set it to position 1 for low pressure air brush applications.
-
Set the air pressure regulator to 50 psi. Pull up on the pressure regulator knob and turn clockwise (CW) to increase pressure and counterclockwise (CCW) to decrease pressure. Note: When increasing pressure, you may need to activate the compressor motor by releasing air in the compressor by pressing the spring-loaded pressure release valve on the bottom of the pressure regulator.
Airbrush Setup
-
Unscrew and remove the material flow knob. Loosen the needle chuck nut and gradually push the needle inwards using the plastic tool provided until it touches the nozzle. Retighten the needle chuck nut.
-
Turn the air adjust knob CW until it stops (Caution: do not over tighten) and then turn CCW one revolution. Note: To increase air flow, turn the air adjust knob CW. Turn CCW to decrease air flow.
-
Turn the material flow knob CW until it stops (Caution: do not over tighten) and then turn CCW one revolution. Note: To increase material flow, turn the material flow knob CW. Turn CCW to decrease material flow.


Figure 1: Air compressor
Figure 1: Air brush
Operation
Use
Applying Coating
-
Place 5-10 drops of emissivity coating in the reservoir.
-
Hold the airbrush 1-2 inches (25-50 mm) away from the part to be sprayed. Note: For best results, hold the airbrush horizontally when spraying.
-
Push the spray trigger down to release air and then pull it back to release the coating.
-
Push the spray trigger forward to stop coating flow and then release upward to stop air flow. Note: Stopping the flow of coating and air in this order will prevent overspray.
-
Spray with a uniform sweep across the part. Examine under a microscope to confirm adequate coating and repeat if necessary.
Removing Coating
The emissivity coating can be removed by dropping several drops of emissivity coating solvent onto the part. If surface tension prevents the drops from removing the coating, place a small amount of solvent in a small, shallow container and move the part back and forth in the solvent.
Clean Airbrush after each use.
Troubleshoot
Maintenance
Cleaning the Airbrush (required after each use)
-
Empty the reservoir completely.
-
Place 5-10 drops of emissivity coating solvent in the reservoir.
-
Hold your finger tightly against the nozzle and push the spray trigger down and back to force air into the reservoir.
-
Remove your finger and spray until the reservoir is empty.