Linear Stages Maintenance
Lubrication
All linear stage assemblies are pregreased at the factory. Linear stage assemblies will operate without lubrication in vacuum or clean room environments, however increased wear of bearing pads will occur but may be minimal with light loads or infrequent use.
If the lead screw or nut “squeals” during operation, this is an indication that adjustment or lubrication is required.
Lubrication Points
For maximum linear stage life, additional lubrication should be applied to the dovetail ways and lead screw at regular intervals.
Lubrication Type
The recommended lubricant is Velmex BL-1 oil (a light consistency NLGI Grade 1 lithium base).
Prohibited Lubricants: Do not use silicone oils, heavy greases, or any type of spray lubricant that may contain strong solvents or fluorocarbons.
Lubrication Interval
|
Use |
Interval |
Application
|
| Continuous (24 hours/day) |
Daily |
Ways and lead screw |
| Several hours/day |
Weekly |
Ways and lead screw |
| Several hours/month |
Monthly |
Ways and lead screw |
Lubrication Procedure
Traverse the carriage near the center of travel and apply 3 to 4 drops of oil to the end of carriage at the dovetail way surfaces and on the lead screw threads. Apply oil to both end of carriage. Occasionally apply 1 to 2 drops of oil to the point where the lead screw enters the lead screw support bearing (end plate end).
BiSlide
For BiSlide lubrication points see Figure 1.
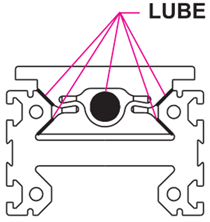
Figure 1: BiSlide Linear stage lubrication points
XSlide
For XSlide lubrication points see Figure 2.
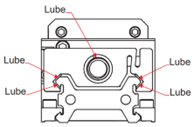
Figure 2: XSlide Linear stage lubrication points
For Best Results
-
Keep debris out of the dovetail ways.
-
Wipe away old accumulations of grease with a clean cloth.
-
Grease dovetail ways and lead screw whenever they lack the appearance of an oily film.
-
Only a light film of grease is required, excess grease is pushed off.
Adjustments
System Config: Some sections in the manual may not apply to your specific system configuration.
Periodic adjustment to the lead screw nut and carriage may be necessary after the initial break-in period and less frequently thereafter.
Lead Screw Nut
The lead screw nut has adjustable mesh to minimize backlash. To minimize backlash, tighten the nut tension screw by turning the nut clockwise in increments of 1/8 turn. Tightening more than 1/8 turn may cause excessive friction and wear.
BiSlide
For a BiSlide, use a 1/8” hex driver (see Figure 3). Test for over tightness by turning lead screw by hand. Lead screw should rotate by twisting with index fingers and thumbs of both hands.

Figure 3: BiSlide lead screw nut and carriage adjustment
XSlide
For an X-Slide, use a 3/32” hex driver (see Figure 4). Test for over tightness by turning lead screw by hand. Lead screw should rotate by twisting with index fingers and thumbs of one hand.
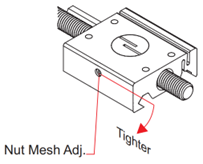
Figure 4: XSlide lead screw nut adjustment
Carriage
Carriage free play is indicated by a clunking or knocking noise when pulling up and down on the corners of the carriage. To reduce carriage free play, turn each bolt clockwise in increments of 1/8 turn. If the carriage seems to clunk only when pulling and pushing on one diagonal of the carriage, then back off slightly on the adjustment bolts at the other diagonal and re-tighten all four bolts evenly 1/8 turn maximum.
Adjust Correctly: Failure to adjust carriage bolts evenly will result in loss of parallelism or proper way contact. An out-of-parallel carriage may angle the limit switch actuator cam to be either too high or low resulting in limit switch failure. Carriage over-tension will result in binding, rapid lead screw, lead screw nut, and pad wear.
BiSlide
Adjust the carriage fit by tightening the four T-30 Torx head bolts on the carriage face (see Figure 3).
XSlide
Adjust the carriage fit by tightening the two Torx head bolts on the carriage side (see Figure 5).
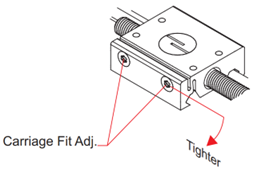
Figure 5: XSlide carriage adjustment